Wednesday, October 26, 2011

Save Those Old Socks!

I am terrible about keeping socks, even when I have lost one to the pair, or they have holes in them, but a few months ago when turning one of my daughters old socks into a tube top/skirt for a barbie I thought hmmm, I could also cut these into loops.  When I was a kid loopers were cool ,and I remember doing all sorts of things with them like making ropes or potholders.  You can use your old socks to make your own "loopers". 
This is a simple and easy task, you simply need old socks, washed of course, and a pair of scissors.  Simply cut the sock into strips or loops, approximately 1 inch wide :


Using socks that have designs don't always work as well, because of the loose threads inside the sock, as you can see when the sock is turned inside out.  I still used the yellow and blue sections that only had small ammounts of loose threads. 

It does take several socks to get enough loopers but if you are like me you probably already have tons of old socks in your drawers just waiting to be pulled out and cut up.
I took a few of the ones I cut and made this rope to show one thing you can do with them.   

Friday, December 10, 2010

Friday and a New Fun Holiday Craft Idea

It has been a busy week for me.  So while I planned on getting more craft ideas up this week, here it is Friday again already, and I haven't posted since Monday. 
Here is my latest craft idea, that will be given away as homemade gifts to family and friends for Christmas.
They are fun and easy to make, and the supplies don't cost much either. 
I actually had all of the supplies on hand to make these.

Today I will show you how to make :Pinecone reindeer.


You need:
small pinecones (mine are about 2- 2 1/2 inches long)
tiny poms (red or black/brown)
brown pipe cleaners
google eyes (small ones)
floss or thread
glue and scissors


First I took the pinecones and glued a tiny pom to the tip of the pinecone.  Then chose the best spot to glue on the two eyes.  You want to make sure that in the center of the top there is a nice part of the pinecone to stick the antlers underneath.

I did a step by step of how I folded the pipecleaners to make the antlers so here it is:

First, fold the pipe cleaner in half.  Then fold each end toward the middle, like the two pipecleaners pictured below:
Then twist the ends to make them stay around the center, and then fold the looped part over in half.  It doesn't have to be equal halves.   Then twist the smaller of the halves together, like the bottom of the two pictured below.

After you have twisted the first half, fold the pipecleaner again on the remaining side and then twist each of those halves together:
adjust the "antlers so they look how you want them to.
Then take a piece of string about 5-6 inches long and tie it togther and then to the center of the antlers:


Take some glue and I used a toothpick, to put it into the crevice of the pinecone at the back of the pinecone.  Then slide the center of the antlers in, with the string.


Let glue dry and hang on Christmas tree!


I hope you have fun making this craft, if you have any questions at all please feel free to contact me.

                          Have a great weekend and HAPPY CRAFTING!!

Monday, December 6, 2010

It's Monday Again, and Time for Another Homemade Gift Idea!

Hello again, I hope everyone had a wonderful weekend.  Since the holiday season is here, I am going to share yet another holiday craft idea with all of you.

This is takes an old idea and changes it up a little bit.  Today we will be doing Homemade Candle Holders.  They will be using baby food jars, but instead of using tissue paper, like we all did when we were younger, I decided to use glitter on ours.  I know what you are thinking..  You are thinking "what a mess glitter makes, it will be falling off everywhere."  BUT, we also coated the jars in glue after we glittered them, this saves you from losing the glitter all over, and it looks really pretty.  Much nicer than the traditional tissue paper idea. 
We started making the tissue paper candle holders, but I wanted something that looked a little bit nicer, than the tissue paper.  As you can see in the photo it is quite shiny, and we tried a few different glues, but they all looked this way when dried. 
So, then I thought glitter would work well.  So with some thin glue (we used puzzle glue, because it is nice and thin) and with a big paintbrush we painted the glue on, then poured glitter over the top of the glue. 
Once the glitter and glue had dried to the jars, we carefully painted another layer of glue over the top of the glitter.  This was to keep the glitter from falling off of the jars. 

After that was all dry, we took some 3/8inch ribbon that coordinated with the glitter on the baby food jars, and wrapped it around the neck of the jar.
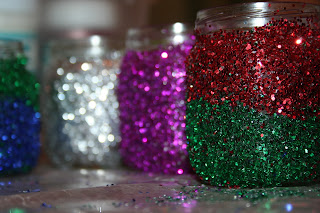
Here is our finished product:


As you can see, they look quite nice with candles in them as well:


We made these as gifts last year, since at the time we had so many baby food jars on hand.  If you don't have a baby in the house, check your local Craigslist or Freecycle.  You can usually find some on there, if there aren't any listed, post and ask for some.  You are bound to find someone willing to give them to you. 
We made sets of two for all of our family members and they were a big hit, everyone loved them. We put tea light candles in them, and I do recommend using the LED lights so you don't have to worry about burning candles.  But this is an inexpensive homemade gift that kids of all ages can help make. 
So enjoy making these candle holders with your children or grandchildren, and if you have any questions, please feel free to send me a message! 

THANKS for visiting my blog, and HAPPY CRAFTING!!

Friday, December 3, 2010

Blog Day 2~ Another Holiday Craft Idea: Tulle Angels

Since Chistmas is near, I thought I would share another holiday craft idea.  This one is Tulle Angels:

You will need

tulle circles
extra plain white tulle
gold ribbon
scissors
needle and thread is optional


I had a bunch of tulle circles on  hand, that my Aunt gave me.  Mine were white with gold rims and white with gold dots.   I also had gold ribbon she gave me as well.  So I didn't have to go buy anything for this craft.  Many of my crafts come from items I already had around the house. 


I took the gold dotted ones and cut them in half:
Then I took the edges and folded them into the center, then bunched the center together.  Next you can either take a piece of ribbon to tie it together in the center like below, or you can take a needle and thread and sew it together to make sure it stays.  (*Make sure your ribbon is atleast 6-8 inches long, to ensure you have enough to then wrap around the angel neck, and then make a loop and tie in the back.*) 

Then I took the gold rimmed tulle circles and a bit of plain tulle and rolled it up into the center, and pinched it together

Now you can either sew the wings onto the back of your angel at the pinched area, or you can use the extra lenght of the gold ribbon and wrap it around the neck to tie it together.

then form a loop with the ribbon and tie in a knot to hold in place.
 IF you use a needle and thread then still take the gold ribbon and wrap around the neck and then loop in the back to make a way to hang your angel. 
And now you have your Angel a quick and easy craft.
This is a great homemade Christmas gift idea for family members and easy for a child to help make.


I hope you will enjoy making this craft with your family, and if you have any questions please feel free to contact me. 
THANKS for reading my blog! 

Thursday, December 2, 2010

A Holiday Craft to Start Off My Blog

Hi, my name is Amanda, I have two young children and I love doing crafts with them.  That is why I decided to start this blog, to share some of my crafty family friendly ideas with everyone else. 

So to start out since Christmas is coming up my first craft I will share is the Pinecone Christmas tree.


 Things you will need for this craft:
pine cones
felt
poms
pop bottle tops
glue and scissors
glitter is optional

First cut circles out of the felt, big enough to wrap around the bottle tops.  put a dab of glue in the center of the felt, wrap around and fill the bottle cap with glue.


Place pinecone bottom into the glue and let set.
*Note* We used hot glue for this project, but you don't have to, it just sets faster, so that is why we chose it for this project.  If you use hot glue, please use caution with children*

Once pinecone tree is set to its base, you can begin to glue the poms on.   Place glue in various spots and set poms in place, then you can put one on top as the star.  I also had some tiny candy canes on hand so we put a few of those on the trees.  You can glitter the trees too if you would like.  Just brush a thin layer of glue over the pinecone and shake glitter over the tree. 
Unfortunately when we did this craft I did not take step-by-step photos, so please if you have any questions about this craft, feel free to contact me.    We made out Christmas Trees to give to family for Christmas presents!  I hope you enjoy making this craft!
     Thanks for reading my blog, and please watch for more family friendly craft ideas and homemade holiday gift ideas coming soon!!!